More fans fail from bad mounting than from electrical problems or bearing defects combined -- a perfectly good fan can turn into a noise generator, or die early, just from how it's bolted in.
- Improper mounting is the leading cause of premature bearing failure and excess noise in DC axial fans -- often worse than running the fan past its rated specs.
- Over-tighten the mounting screws and you can distort the frame and misalign the rotor. Under-tighten them and vibration transmits straight through into the enclosure.
- Anti-vibration pads and gaskets can cut transmitted vibration by 60-80% compared to bolting metal straight to metal, though the material matters more than the thickness.
- Rubber mounts give the best isolation for noise-sensitive builds, but they need to be sized correctly or they'll restrict airflow or introduce new resonance.
- Mounting orientation affects both airflow and bearing life -- horizontal mounting tends to give sleeve bearings the longest service life.
In 30 years of working with DC fans, I've seen more field failures caused by improper mounting than by electrical issues or bearing defects combined. A perfectly good fan can become a noise generator or fail prematurely if it's mounted incorrectly, while proper anti-vibration techniques can extend service life and reduce noise levels significantly. The physics of vibration transmission means that even small mounting errors get amplified through the enclosure structure, something I learned the hard way early in my career and have been correcting in customer designs ever since.

Table of Contents
Why Does Improper Mounting Cause Noise?
When a fan is mounted incorrectly, it creates two distinct noise problems: direct mechanical noise from the fan itself, and transmitted vibration that turns the entire enclosure into an amplifier.
Frame distortion is the most common mounting error I encounter. Over-tightening screws can warp the fan frame by fractions of a millimeter — invisible to the eye, but enough to throw the rotor out of balance. This creates vibration that wasn't present when the fan was manufactured, leading to bearing wear and noise that increases over time. If you're still getting familiar with what's actually inside a DC axial fan and how it works, understanding the rotor-and-frame relationship makes this failure mode much easier to spot.
Vibration transmission occurs when fan vibration couples directly into the enclosure structure. Even a well-balanced fan produces some vibration during operation, but metal-to-metal mounting transmits this energy directly into panels, heat sinks, and chassis components that act as resonating surfaces. According to fan engineering references on vibration isolation, isolators work by limiting the amount of force a vibrating fan transfers to its supporting structure rather than eliminating the vibration itself 1, which is exactly what I see in the field: the fan's own noise stays the same, but the structure-borne noise drops sharply once isolation is added.
Resonance amplification happens when the fan's operating frequency matches a natural resonance frequency of the mounting structure. A 3000 RPM fan produces vibration at 50Hz, and if the enclosure has a panel or bracket that resonates near 50Hz, the combined noise can be 10-15dB higher than either source alone.
What Fan Mounting Screw Types and Torque Should You Use?
| Screw type | Best application | Torque range | Key considerations |
|---|---|---|---|
| Machine screws (M3, M4) | Standard chassis mounting with threaded holes | 0.5-1.0 Nm | Most common, allows precise torque control |
| Self-tapping screws | Sheet metal enclosures without threaded holes | 0.3-0.8 Nm | Higher risk of over-tightening and frame distortion |
| Thumb screws | Field-serviceable installations | Hand-tight only | Convenient but requires discipline to avoid over-tightening |
| Captive screws | OEM assemblies with frequent service access | 0.4-0.9 Nm | Prevents lost hardware but limits torque precision |
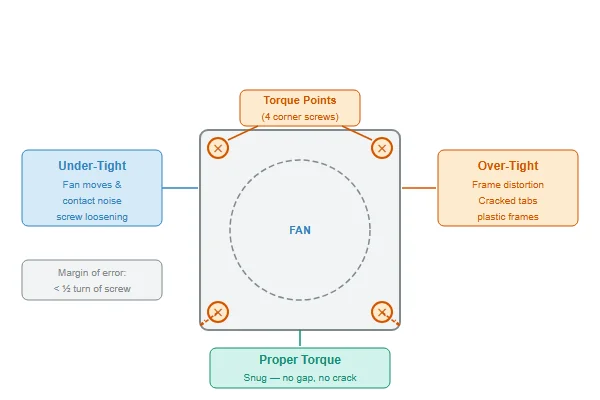
The critical factor is applying consistent, appropriate torque to all mounting points. I recommend using a torque-limiting screwdriver or torque wrench for production assembly, because the difference between proper seating and frame distortion is often less than half a turn of the screw.
Under-tightening allows the fan to move slightly during operation, which creates intermittent contact noise and accelerates screw loosening. Over-tightening distorts the frame and can crack the mounting tabs on smaller fans, especially those with plastic frames.
How Do Anti-Vibration Pads and Gaskets Work?
Anti-vibration pads and gaskets work by introducing a compliant material between the fan frame and mounting surface that absorbs vibration energy instead of transmitting it. The material choice and thickness both affect performance, but material selection typically matters more than dimensional specifications.
Neoprene and silicone are the most common pad materials. Neoprene provides good vibration isolation and temperature resistance up to about 80°C, while silicone maintains flexibility at higher temperatures but costs more. Both materials work by converting vibration energy into heat through internal friction.
Closed-cell foam pads are less expensive but provide limited vibration isolation compared to rubber materials. They work better for sealing and dust protection than for serious noise reduction, though they're adequate for applications where cost is the primary concern.
Thickness considerations: Thicker pads provide more isolation but can create clearance problems and may introduce new resonance frequencies. I typically recommend 2-4mm thickness as a good compromise between isolation performance and mechanical stability.
The installation sequence matters: install the pad, position the fan, then gradually tighten screws in a diagonal pattern to compress the pad evenly. Uneven compression reduces isolation effectiveness and can still cause frame distortion.
With more than 20 years of production and R&D experience, Herays manufactures DC axial fans as an OEM partner for several well-known brands, under a quality system certified to ISO 9001, ISO 14001, QC 080000, and IATF 16949. Our automated dynamic balance test and correction equipment ensures that fans leave the factory with minimal inherent vibration, but proper mounting technique is still critical — we've measured properly isolated fans running 8-12dB quieter than the same models mounted directly to metal, which is why we provide mounting guidelines and anti-vibration hardware recommendations for noise-sensitive OEM applications.
How Do Rubber Fan Mounts Work?
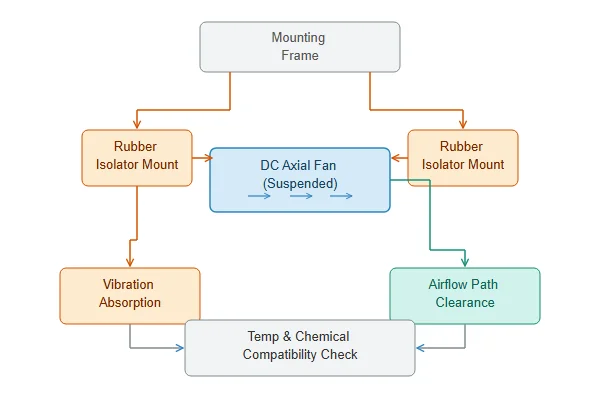
Rubber fan mounts represent the highest level of vibration isolation available for DC axial fans. Instead of rigid mounting with pads, rubber mounts support the entire fan in a flexible suspension that decouples it almost completely from the enclosure structure.
Corner mounts are the most common design, with rubber grommets or bushings installed at each mounting corner. The fan is suspended within the rubber elements, which flex to absorb vibration in all directions. This provides excellent isolation but requires careful sizing to ensure the rubber elements don't restrict airflow around the fan frame — something worth checking against a DC axial fan sizing guide before you finalize the mount design, since the clearance margins vary quite a bit across frame sizes.
Frame-integrated mounts use rubber elements molded or bonded directly to the fan frame during manufacturing. This approach provides good isolation with minimal installation complexity, but limits serviceability since the rubber elements age along with the fan.
Isolation requirements vs. stability: Softer rubber provides better vibration isolation, but if it's too soft, the fan can move excessively under airflow forces or during startup/shutdown. The mounting system needs enough stiffness to keep the fan properly positioned while still isolating vibration during steady-state operation.
Temperature and chemical compatibility matter more with rubber mounts than with rigid mounting, since rubber degradation can lead to fan displacement or mounting failure over time.
What About Mounting Orientation and Airflow Direction?
Mounting orientation affects both cooling performance and mechanical longevity, particularly for fans with sleeve bearings. The orientation that provides the best airflow isn't always the orientation that maximizes bearing life.
Horizontal mounting (fan shaft horizontal, typically blowing horizontally) generally provides the longest bearing life because it minimizes gravitational loading on the bearing surfaces. This is especially important for sleeve bearings, where the rotor weight can accelerate wear if the shaft runs vertically for extended periods.
Vertical mounting (fan shaft vertical) puts more load on the bearing but may be necessary for optimal airflow in many enclosure designs. Ball bearings handle vertical mounting better than sleeve bearings, so bearing type becomes a more critical selection factor when vertical mounting is required.
Airflow direction should be confirmed during installation — most fans have an arrow molded into the frame showing airflow direction, but it's easy to install a fan backwards and not notice the performance difference until thermal testing. If you want to confirm this without guesswork, I'd suggest learning how to test and troubleshoot a DC axial fan so you can verify airflow direction and output during commissioning rather than after a thermal failure. Backward installation typically reduces airflow by 20-30% and may increase noise.
Clearance requirements: Proper mounting provides adequate clearance on both the intake and exhaust sides. I typically recommend at least one fan diameter of clearance on the exhaust side and half a fan diameter on the intake side for optimal performance, though space constraints often require compromising these ideals.
FAQ
What's the most common fan mounting mistake that causes noise problems? Over-tightening mounting screws, which distorts the fan frame and throws the rotor out of balance. This creates vibration that wasn't present when the fan was manufactured and typically gets worse over time as bearings wear.
Do I need anti-vibration mounting for all DC fan installations? Not necessarily — if noise isn't a concern and the fan runs intermittently, direct mounting may be adequate. But for continuous-duty applications or noise-sensitive environments, anti-vibration mounting typically provides significant benefits for minimal additional cost.
Can I use standard rubber washers instead of purpose-made anti-vibration pads? Standard washers provide some isolation but aren't optimized for vibration absorption. Purpose-made pads use materials and geometry specifically designed for vibration isolation, so they typically perform better than improvised solutions.
How do I know if my fan mounting is causing vibration problems? Listen for noise that changes when you lightly touch the enclosure near the fan, or noise that increases over the first few weeks of operation. Both symptoms typically indicate mounting-related vibration issues rather than inherent fan defects.
Does mounting orientation affect fan lifespan? Yes, especially for sleeve bearings. Horizontal mounting (fan shaft horizontal) typically provides the longest service life because it minimizes gravitational loading on the bearing surfaces. Ball bearings are less sensitive to orientation but still perform best in horizontal mounting.
"Vibration Isolation of Fans" (FE-1900), https://www.tcf.com/wp-content/uploads/2021/12/Vibration-Isolation-of-Fans-FE-1900.pdf. A fan engineering technical bulletin from Twin City Fan & Blower explaining how vibration isolators limit the force a vibrating fan transmits to its supporting structure. ↩

Liang
I've been working with DC fans for 30 years — long enough to have seen the industry evolve from basic sleeve bearing designs to today's high-efficiency, IP68-rated systems built for the harshest environments imaginable. I founded Herays because I believed manufacturers and engineers deserved a supplier who could talk technical from day one. Not just hand over a datasheet, but actually help you select the right fan for your thermal load, your enclosure, your certification requirements. Most of what I write here comes directly from problems I've solved on the factory floor or in customer applications — medical devices, laser equipment, industrial automation, you name it. If it involves moving air efficiently and reliably, I've probably spent time thinking about it. When I'm not obsessing over airflow curves, I'm usually helping a customer figure out why their cooling system isn't performing the way their simulation said it would.
View all posts by Liang